
The ZZ plant copes with the corners of a house that other plants give up on
This guide covers how much light a ZZ plant actually needs, how often to water it through a British winter, and which pot keeps its roots in good condition.
Browse the full plant care guidesHow little light does a ZZ plant actually need?
Most houseplants sold as "low light tolerant" still want a spot near a window. The ZZ plant is one of the few that genuinely doesn't, which is why it turns up in office reception areas and windowless hallways where nothing else survives a month.
Why it copes where other plants fade
A ZZ plant builds up a store of water and energy in thick rhizomes below the soil, and that store lets it sit through long stretches without much light reaching its leaves at all. Growth slows right down, and the leaves stay glossy and dark green.
Fluorescent light is enough
Overhead fluorescent tubes give off light in a spectrum the plant can actually use, so an office desk or a corridor lit only by strip lighting through the working day gives a ZZ plant something to grow on. Natural daylight is still better for it, but it isn't a requirement, which is unusual: most houseplants sold as office-friendly still need some daylight to stay alive long term.
Where this matters in a British home
That makes the ZZ plant one of the few sensible choices for a space with no window at all: an internal hallway, a windowless bathroom, or the back corner of a north-facing flat that gets almost no direct sun through a British winter. For other rooms with a bit more light to work with, the plants for British rooms guide goes through what actually copes in each one.
How often to water a ZZ plant
A ZZ plant keeps a reserve of water inside the swollen rhizomes it grows just under the soil line. That reserve is what lets it sit untouched for weeks without showing any strain, and it is also why the plant suffers far more from too much water than too little.
How often to water
Water every 2 to 3 weeks through the British summer, when the plant is putting on growth and using more of what is in the pot. Once the heating goes on and light drops in autumn, stretch that out to every 4 to 6 weeks, because the rhizomes are doing almost nothing with the water you add and the soil simply sits wet for longer.
A date on a calendar is a poor guide for this plant. Push a finger into the soil to a depth of about 5cm before each scheduled watering, and only add water once it comes back dry. If it is still damp, wait another week and check again rather than watering anyway.
Why the risk runs one way
A ZZ plant left dry for an extra fortnight will barely notice. One left standing in wet soil for the same stretch can start to soften at the rhizome, which is harder to recover from than a missed watering ever is. The pot and the drainage underneath it do a lot of that work for you, and the drainage guide covers how to set that up properly whether or not the pot you own has a hole in the base.
Why terracotta suits a plant built to store its own water
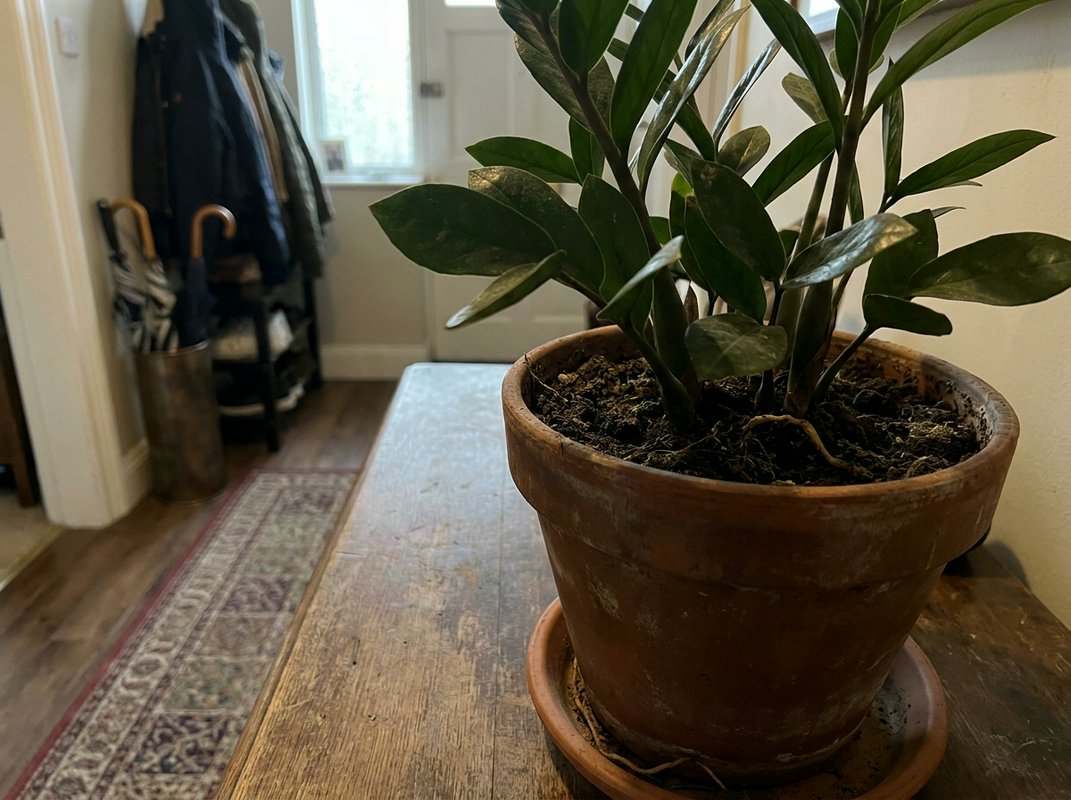
A terracotta pot with a drainage hole suits a ZZ plant better than most alternatives, and the reason comes down to what the pot does to the soil around the roots. Terracotta is porous, so moisture passes through the clay walls as well as evaporating from the surface. That pulls the soil towards dry faster than a glazed ceramic or plastic pot would, which is exactly what a plant that would rather sit dry than damp needs.
The rhizomes a ZZ grows below the soil are heavy for the size of the plant, and they thicken over the years. A lightweight plastic pot can tip or shuffle as that weight builds and the foliage spreads above it. Terracotta carries enough weight of its own to keep the plant anchored without extra ballast, and a wider base helps more than a tall, narrow shape.
The drainage hole matters as much as the material. Terracotta without one still holds water against the base of the pot, which undoes the drying effect the clay is meant to provide. A saucer underneath catches what drains through, and emptying it after watering keeps the roots from sitting in standing water.
Pot size plays the same role here as it does for most slow growers: a ZZ does not need repotting often, and a pot sized generously now will often see it through a couple of years before it needs to go up a size. Moving up by around 2 to 3 centimetres in diameter at that point gives the rhizomes room to expand without leaving a wide ring of soil that stays wet long after the roots have used what they need.
What goes wrong with a ZZ plant, and why the pot is usually involved
Yellowing stems from the base up
When a ZZ plant yellows low down on the stem while the new growth near the top stays dark and glossy, the cause sits below the soil. The rhizomes that give this plant its drought tolerance are also where overwatering shows up first, because they rot from the inside once they sit in wet soil for too long. By the time a stem has gone soft and yellow at the base, that stem will not recover, and the usual response is to cut it away at the rhizome.
The pot is doing half the work here. A container with no way for excess water to escape keeps the base of the rhizome wet long after the surface looks dry, which is the condition that starts the rot in the first place. The drainage setup matters more for a ZZ plant than for most houseplants, precisely because the plant is built to go weeks between waterings and the pot needs to let it.
Leaning towards the nearest light
A ZZ plant grown in a corner with light coming from one side only will curve the whole clump of stems towards it within a few weeks, and the lean gets more pronounced as the stems lengthen. This is simply the plant growing towards the brightest source it can find, and in a hallway or office spot lit mainly by one window or a run of fluorescent tubes, that source rarely sits directly overhead.
Giving the pot a quarter turn every week or two keeps the growth roughly even on all sides, since no part of the plant stays shaded for long enough to develop a permanent lean. Once a stem has set hard in a curved shape it tends to stay that way even after turning, so it is easier to correct a slight lean early than to straighten one that has been left for months.
Rhizomes splitting a plastic pot
Underground, the rhizomes thicken and divide over a few years, and a pot that fit the plant comfortably when it was bought can end up bulging at the base or splitting along a seam as the root mass runs out of room. Thin plastic nursery pots are the most common casualty, simply because they flex, and a split often isn't obvious until the pot is lifted and the crack is visible underneath.
A bulging or cracked pot is a sizing problem, and the answer is to move the plant into a container with more room before the current one fails outright. Choosing the right planter size covers how much larger to go and how to judge when a plant has genuinely outgrown its pot, and a heavier, rigid material from the planter materials comparison copes with an expanding root mass better than thin plastic does.